How to perform CPR steps
CPR, an abbreviation for cardiopulmonary resuscitation, is a first aid skill that is very valuable in emergencies where a person’s heart stops, for example, near drowning or a heart attack. The American Heart Association (AHA) urges everyone to acquire even the most basic CPR skills, which often begins with compressions on the chest. Remember, when you’re a bystander during an emergency, it’s far better to do something than to do nothing, even when you’re fearful that you do not possess detailed knowledge of the technique. It’s better to do something even when you have only basic CPR abilities than watch someone lose their life.
According to the AHA, everyone can do something during an emergency as described below:
Untrained
If you do not have adequate CPR training, it’s advisable to give the victim CPR with your hands only. This means that you’ll be giving chest compressions of 100 to 120 every minute (as explained in detail below) until the arrival of paramedics. There is no need to attempt rescue breathing if you’re untrained.
Trained and confident
If you’re well trained and you have confidence in your CPR skills, then proceed to check if the victim is still breathing and has a pulse. If there is no pulse or breathing after 10 seconds, you should start chest compressions. The CPR should start with 30 chest compressions and then two rescue breaths.
Trained but not confident
If you have CPR training but lack confidence in your skills, then just give chest compressions of 100 to 120 every minute as you wait for the healthcare professionals to arrive.
This advice is applicable to adults and children, including infants who need to be resuscitated; however, CPR should not be given to newborns. CPR is given to a person whose heart has stopped so that oxygenated blood can be continuously pumped into the brain, and other essential body organs. This will keep the person alive until a better medical therapy can be implemented to restore the normal rhythm of a heartbeat. Lack of oxygenated blood can lead to brain damage, which can be fatal if the victim is not given first aid within 10 minutes.
Take a CPR course from an institution if you want to learn the skill properly; it will comprise training on how to use an AED (automated external defibrillator). Untrained people should first call 911 or any other emergency number in the local area before they start giving CPR. The operator will instruct you on how to conduct the procedure properly while you wait for the dispatched paramedics to arrive.
What to do before you start CPR
Before you begin CPR, you should do the following:
- Determine whether or not the environment is safe and does not pose any threat to you or the person you are trying to rescue.
- Check if the person is conscious or not; CPR should only be given to unconscious people.
- If the person appears to be unconscious, try to wake him/her up by tapping the shoulder or shaking his/her body. You should be talking to them in a loud voice at the same time while asking questions that require a response from the person.
- If you do not get a response from the person and there are other bystanders present, instruct one person to call 911 and bring the AED, if there is one available. You can now start giving the person CPR.
- In case you are alone, first call 911 or the local emergency number, then you can start CPR. Get the AED if it is available.
- Once you have the AED at hand, follow the instructions on the device, which entail giving the person one shock, and then starting CPR.
Remember CAB when giving CPR
The acronym CAB (compressions, airway, and breathing) was created by the AHA to enable people to remember the order in which the steps of CPR should be performed.
Compressions (used to restore the circulation of blood)
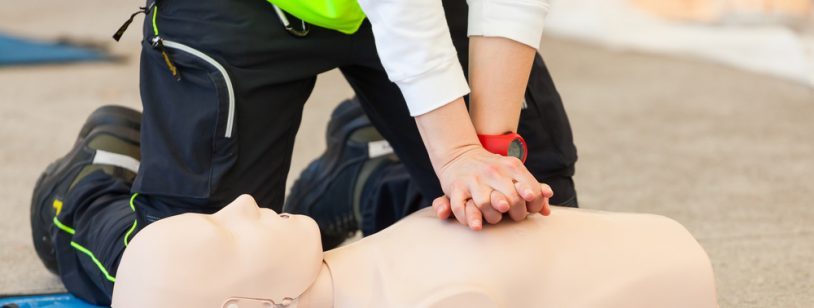
- The first step is to put the victim on a solid surface on his/her back.
- Get into a kneeling position next to the victim’s shoulders and neck.
- Take one of your hands and place its heel over the center of the victim’s chest, the position should be between the person’s nipples. Place the other hand above the first one and maintain a straight posture on your elbows, which should be positioned directly on top of your hands.
- Apart from using your arms to exert pressure, you should also use the weight on your upper body. Exert pressure directly down on the chest at least 5 centimeters (2 inches) but not more than 6 centimeters (2.4 inches). Push hard (compress) at a speed that ranges from 100 to 120 compressions per minute.
- If you do not have any training in CPR, it’s recommended to continue compressing the chest until the person begins to move or until the paramedics arrive and take over the situation. People with CPR training, on the other hand, can proceed to the next step, which is opening the airway to start rescue breathing.
- You should take turns with other bystanders (after every 3 minutes) so that injury or fatigue can be prevented; swap to give each other time to rest without stopping CPR.
Airway (it entails unblocking the airway)
If you have CPR training, you should proceed to opening the airway of the victim (by tilting his/her head and chin) after you have successfully completed 30 compressions on the chest. When tilting the head, place your palm on the forehead of the person while gently moving it back. Use your other hand to lift the chin gently for the airway to open.
Breathing (breathe on behalf of the victim)
Rescue breathing is usually mouth-to-mouth resuscitation, but if the person cannot open his/her mouth, mouth-to-nose can suffice.
The technique is completed through the steps described below:
- Once you use the head and the chin lift technique to open the airway, proceed to breathe for the victim, by pinching his/her nostrils shut (for the mouth-to-mouth revival) and placing your mouth on top of the victim’s mouth to make a seal.
- Prepare to give the person two rescue breaths. The first breath should last for one second only, and you should stop to see if the victim’s chest will rise before proceeding. If the chest rises, you can give the person the second rescue breath. One cycle comprises of 30 chest compressions that are given before the two rescue breaths. Exercise caution when giving breath; do not breathe with excessive force or give the person numerous breaths.
- To restore normal blood circulation, you should restart the chest compressions.
- If an AED is available, use it by following the prompts. Give the person one shock before resuming CPR; start with the chest compressions for two minutes prior to giving the second shock. Untrained people can be guided by a 911 operator on how to use an AED. If it is not available, proceed to the next step.
- Continue giving CPR until the person starts to move or the paramedics take over.
How to give CPR to a child
The process of performing CPR on children older than one year is similar to the one described above for adults.
The AHA advocates for the following steps when giving a child CPR:
- If you did not see how the child fell down, give the child five sets of compressions and breaths. This step should not take more than two minutes. Call 911 and get an AED if it’s available. In case you’re alone and you witness the child falling, call 911 or the local emergency number, acquire the AED, and then start CPR. If there is another person present, start CPR while that person calls for help and finds the AED.
- If it’s a very small child, use one hand for doing chest compressions. Exert pressure straight down about 5 centimeters (2 inches) but not more than 6 centimeters (2.4 inches). Push at a speed of 100 to 120 compressions per minute.
- Give 30 compressions before you give the two breaths (this is one cycle), which is the same rate used when performing CPR on an adult. Proceed to the next cycle after the breaths. If there are other bystanders, let another person give the next cycle.
- Apply the AED and follow the given prompts. For children younger than eight years, you should use pediatric pads, if they are available; you can use pads for adults if these aren’t available. Give the child one shock and then continue with CPR for two minutes before giving the second shock.
Continue giving the child CPR until he/she starts to move or the paramedics arrive.
How to give CPR to an infant
Cardiac arrest mostly occurs in babies when the brain lacks a sufficient oxygen supply, which is usually caused by choking or drowning. If you saw the baby choke and is, therefore, suffering from an obstructed airway, first aid for choking should be administered. Start CPR immediately if you do not know the reason that caused the child to stop breathing.
Stroke the baby and wait for movement or any other form of response; however, do not shake an unconscious baby. If the baby does not respond, observe the CAB technique described below. This applies to babies younger than one year, except for newborns.
- If you did not see how the baby lost consciousness and you’re the only one present, give five cycles of CPR that should last approximately two minutes. The next step is to call 911 or the local emergency number before you start using the AED, if it’s available.
- Focus on the baby if there are other people present while another person calls the paramedics and gets the AED.
Compressions to restore circulation of blood
- Put the baby on a flat, solid surface such as the floor, ground, or a table on his/her back.
- Place two of your fingers on the baby’s chest (at the center) right between the nipples.
- Compress the baby’s chest gently approximately 4 centimeters (1.5 inches).
- Pump at a speed of 100 to 120 compressions every minute while counting out loud in a quick rhythm.
Open the baby’s airway
Unblock the airway by tipping the baby’s head gently using one hand while pushing the forehead down using your other hand.
Breathe on behalf of the baby
- Use your mouth to cover the nose and mouth of the baby.
- Prepare yourself to provide two rescue breaths. Do not take deep breaths (from the lungs), but rather, give the baby gentle air puffs from your cheeks. Deliver the breath for a second and then watch for any movement signs from the baby. If the chest rises, give the baby the second rescue breath; however, do the head and the chin lift technique again if the chest does not move.
- Continue giving the baby chest compressions if there are still no movements visible on the chest.
- After giving 30 compressions, you should give the baby two breaths. If there are other people present, another person can perform the second set of CPR.
- Focus on the baby by giving him/her CPR for two minutes prior to calling 911 for help. Someone else can make the call if there are other people present.
- Continue giving the baby CPR until signs of life become visible or paramedics arrive.
Important CPR information
You can perform CPR in a basic form that does not require any equipment. Nevertheless, universal precautions must still be observed such as wearing gloves, a gown, or masks. Since most of the emergencies occur at places where these items may be unavailable, CPR is usually performed without the protective gear, especially if it’s a setting that’s outside of the hospital. In hospitals, there are devices similar to EMS systems that are used to provide the chest compressions. Cardiac defibrillators are used to restore the normal heartbeat rhythm by delivering electrical shocks through two electrodes placed on the patient’s body.
Paramedics or other professional healthcare providers are present in a hospital and this is why the ACLS emphasizes the importance of a more robust cardiac arrest therapy.
The guidelines cover the following:
- Drug interventions
- Defibrillation
- Invasive airway techniques
- ECG monitoring
Patients with a history of cardiac arrest should receive CPR early enough and appropriate aftercare for a better success rate. CPR training is vital in increasing the survival rate of choking and drowning with the hands-only or compression-only (COCPR) technique being more favorable to non-medical witness of such emergencies. Studies on whether CPR is more effective than COCPR are still inconclusive. According to the AHA guidelines for CPR, untrained bystanders are supposed to give the victim COCPR rather than do nothing at all.
Approximately 30,000 people suffer from cardiac arrest every year in the U.S. Survival rates are higher for people in hospitals, but lower for events that occur outside of the hospital. Studies also reveal that the chance for survival diminishes each minute if CPR is not given to the victim, but the chances increase 3-fold when someone starts CPR within minutes of the emergency. Also, events that occur in public settings have a higher survival rate than those that occur at home, especially when the victim is alone.