Here's how to perform high-quality CPR (compressions plus ventilation):
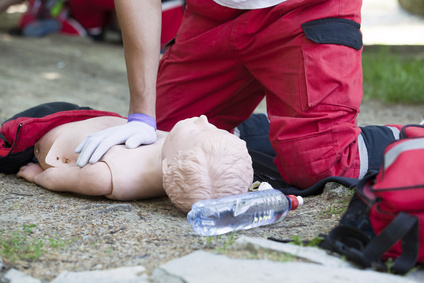
C is for Circulation – Compressions
To do so, find the point where the patient’s ribs meet (just below both halves) and interlock your fingers with both hands. Make sure you’re kneeling beside the patient’s shoulders (Do Not Lean on Patient). Once in position, lock your elbows and use your body’s weight to compress 2 inches upon the patient’s chest. Make sure to let the patient’s chest rise after each compression. Compressions on an infant are pressed just below the nipples.
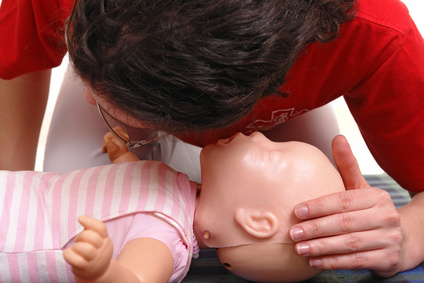
Infant CPR - 2 Rescuers: One Rescuer should use two hands holding the infant facing up while positioning the fingers in the middle of the infant’s chest as the other rescuer uses a one-way valve—placing it over the infant’s mouth and nose. One rescuer will perform compressions while the other uses the rescue valve. You can also apply a ratio of 15:2 compressions to breathing.
Chest Compression Tempo: perform CPR while matching the tempo of the song, "Staying Alive" while making sure to push hard and fast.
Chest Compression Fraction: is the total percentage of resuscitation time when performed by the rescuer(s) during cardiac arrest. Whether intended or unintended interruptions (such as real-world delays) occur Chest Compression Fraction aims to minimize pauses in chest compressions. Chest Compression Fraction Goal: target of at least 60%.
Remember, until help arrives, administer CPR. Perform 100-120 compressions per minute.
Healthcare providers are the profession at the highest risk for contracting COVID-19. Many work in close contact with patients suspected or confirmed to have the disease. To improve their safety and limit their exposure, updates have been made to existing CPR recommendations. These include limiting personnel attending to a patient, encouraging bystander CPR, and emphasizing providing at least hands-only CPR.
First responders are advised to put on PPE before entering the scene. CPR should consist of cycles of thirty compressions and two rescue breaths. When giving rescue breaths, a bag-mask that has a tight seal and filter should be used. Alternatively, continuous chest compressions with passive oxygenation can be provided whilst wearing a protective medical mask. Mechanical CPR devices can be used for patients who meet the height and weight requirements to reduce aerosolization risk.
For adult victims, it is recommended to provide at least hands-only CPR after a cardiac arrest is known to have occurred. The healthcare provider and/or victim should wear a face mask to reduce the risk of contagion for the safety of both, as well as any none-household bystanders.
For children, chest compressions should be performed and mouth-to-mouth ventilation may be considered. Again, mask-wearing is advised for both the healthcare provider and/or victim.
What is Personal Protective Equipment?
PPE (Personal Protective Equipment) keeps you safe from blood, hazardous materials, and OPIM. PPE includes:
- Face shields
- CPR shields
- Gloves
- Goggles
- Gowns
- Masks
All Personal Protective Equipment promotes safety by creating a barrier between you and the infection/hazardous materials. Before arriving at the scene of the accident, you must assess the situation to determine the risks and to use the proper PPE.
PPE examples include CPR shields provide protection against exposure when performing CPR. Face shields provide splash and high impact protection, while gloves protect against exposure from skin contact with chemicals, infectious agents, cold, heat, and cutting objects. For proper protection, be sure to use the correct hand.
Goggles are designed to reduce the risk of exposure to laser radiation, chemical splashes, or flying debris. Gowns are used to prevent the penetration of infectious blood, hazardous materials, or other OPIM. Masks are used to protect the employee from airborne materials or liquid contaminating the face.
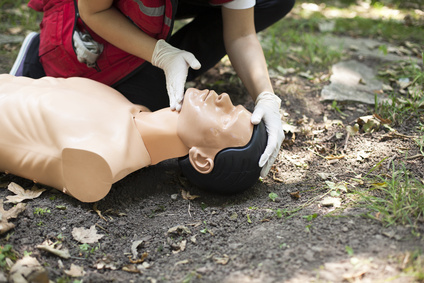
A is for Airway. Clear the Airway
Check for any obstructions, such as the tongue, foreign objects, vomit, swelling, or food blocking the patient’s throat or windpipe (finger-swipe, if necessary).
Make sure the patient is on a solid surface (on the backside). Next, kneel next to the patient’s neck and shoulders. Open the patient’s airway by tilting the head back with the palm of one hand while gently lifting the chin with your other hand. For no more than 10 seconds, check for life: listen for any sounds, put your cheek next to the patient’s mouth to feel any breaths while also looking for any motion. Rescuers can check steps simultaneously. If the patient is assumed lifeless begin Mouth-to-Mouth procedure.
Perform Chest Compressions on patients who are obese or pregnant.
B is for Breathing. Mouth-to-Mouth
Rescue Breathing: Perform mouth-to-mouth; however, it can also be performed mouth-to-nose, mouth-to-mask, and mouth-to-stoma, but in rare cases.
Breathing tasks: While still performing the Airway technique pinch the patient’s nose shut. With a complete seal over the patient’s mouth, with your mouth, breathe into the patient until you see the chest inflate. If the chest does not rise, repeat the Airway technique. When performing the breathing technique make sure to give two breaths for 1 second each.
Once the breathing technique is applied, you will continue the C-A-B’s.
CPR for Infants (Age Less Than 1 Year, Excluding Newborns)
- Witnessed Collapse: call 911 or have someone call
- Un-Witnessed Collapse: perform CPR (for 2 minutes), call 911, or have someone call
- Chest compressions - 100-120/min
- Perform CPR - Circulate, Airway, Breathing (C-A-B’s)
- Compressions at about 1½ inches (4 cm) - 1/3 AP diameter of the chest
- 30:2 compressions over breaths (seal infant’s mouth and nose) - 2 Rescuers 15:2
- 2 Rescuers: 2 thumbs compression
- Use AED as soon as it's available
Scene safety
- Check the environment – making sure it’s safe for rescuers and victims
Recognition of cardiac arrest
- Check responsiveness
- No breathing or only gasping – ie., no normal breathing
- Within 10 seconds – no positive pulse
- (You can check for a pulse and breathing simultaneously in less than 10 seconds)
Activation of the emergency response system
- Witnessed collapse
1. Leave the victim, if you’re alone without a mobile phone, and activate the emergency response system while retrieving an AED before performing CPR - Unwitnessed collapse
1. Give 2 minutes of CPR
2. Activate the emergency response system, get an AED and return to the victim
3. Resume CPR; use the AED as soon as it is available
Compression- ventilation ratio without advanced airway
- 1 rescuer
30:2 - 2 or more rescuers
15:2
Compression- ventilation ratio with advanced airway
- Chest compressions – 100-120/min
- Give 1 breath every 6 seconds (10 breaths/min)
Compression rate
- 100-120/min
Compression depth
- At least 1/3 AP diameter of the chest
- About 1½ inches (4 cm)
Hand placement
- 1 rescuer
Just below the nipple line – 2 fingers in the center of the chest - 2 or more rescuers
2 thumb–encircling hands in the center of the chest, just below the nipple line – encircling hands (2 thumbs) in center of the chest
Chest recoil
- Make sure not to lean on the chest of the victim – Allow a full recoil after each chest compression
Minimizing interruptions
- Compression interruptions – limit to less than 10 seconds
CPR for Children (Age 1 Year to Puberty)
- Witnessed Collapse: call 911 or have someone call
- Un-Witnessed Collapse: perform CPR (for 2 minutes), call 911, or have someone call
- Chest compressions - 100-120/min
- Perform CPR - Circulate, Airway, Breathing (C-A-B’s)
- Compressions at about 2 inches (5 cm) - 1/3 AP diameter of the chest
- 30:2 compressions over breaths - 2 Rescuers 15:2
- 2 Rescuers: Perform tasks simultaneously
- Use AED as soon as it's available
Scene safety
- Check the environment – making sure it’s safe for rescuers and victims
Recognition of cardiac arrest
- Check responsiveness
- No breathing or only gasping – ie., no normal breathing
- Within 10 seconds – no positive pulse
- (You can check for a pulse and breathing simultaneously in less than 10 seconds)
Activation of the emergency response system
- Witnessed collapse
1. Leave the victim, if you’re alone without a mobile phone, and activate the emergency response system while retrieving an AED before performing CPR - Unwitnessed collapse
1. Give 2 minutes of CPR
2. Activate the emergency response system, get an AED and return to the victim
3. Resume CPR; use the AED as soon as it is available
Compression- ventilation ratio without advanced airway
- 1 rescuer
30:2 - 2 or more rescuers
15:2
Compression- ventilation ratio with advanced airway
- Chest compressions – 100-120/min
- Give 1 breath every 6 seconds (10 breaths/min)
Compression rate
- 100-120/min
Compression depth
- At least 1/3 AP diameter of the chest
- About 2 inches (5 cm)
Hand placement
- 1 or 2 hands can be used (optional for small children)
- On the lower half of the breastbone (sternum)
Chest recoil
- Make sure not to lean on the chest of the victim – Allow a full recoil after each chest compression
Minimizing interruptions
- Compression interruptions – limit to less than 10 seconds
CPR for Adults & Adolescents
- Check for life
- Before performing CPR call 911 or have someone else call
- Chest compressions - 100-120/min
- 2 Rescuers: Perform tasks simultaneously
- Perform CPR – Circulate, Airway, Breathing (C-A-B’s)
- Compressions at about 2 inches (5 cm)
- 1 or 2 rescuers - 30:2 compressions over breaths
- Use AED as soon as it's available
Scene safety
- Check the environment – making sure it’s safe for rescuers and victims
Recognition of cardiac arrest
- Check responsiveness
- No breathing or only gasping – ie., no normal breathing
- Within 10 seconds – no positive pulse
- (You can check for a pulse and breathing simultaneously in less than 10 seconds)
Activation of the emergency response system
- If you do not have a mobile phone – leave the victim and activate the emergency response system while retrieving an AED before performing CPR.
- Have someone activate the emergency response system. Perform CPR immediately and use the AED as it becomes available.
Compression- ventilation ratio without advanced airway
- 1 or 2 rescuers – 30:2
Compression- ventilation ratio with advanced airway
- Chest compressions – 100-120/min
- Give 1 breath every 6 seconds (10 breaths/min)
Compression rate
- 100-120/min
Compression depth
- At least 2 inches (5 cm)
Hand placement
- 2 hands-on the breastbone (sternum) on the lower half
Chest recoil
- Make sure not to lean on the chest of the victim – Allow a full recoil after each chest compression
Minimizing interruptions
- Compression interruptions – limit to less than 10 seconds
Rescuers should never
- Compress slower than 100/min or faster than 120/min
- Compress in-depth less than 2 inches (5 cm) or more than 2.4 (6 cm)
- Lean on victim’s chest during compressions
- Allow interruption during compressions more than 10 seconds
- Provide excessive ventilation during breathing task, ie., excessive breathing with force or too many breaths
When to stop CPR
• When you’re too exhausted to continue
• Broken ribs, lung collapses, etc.
• If an Automated External Defibrillator (AED) is accessible
• If Emergency Medical Services (EMS) arrives
Opioid poisoning CPR for lay persons
1. For suspected opioid poisoning
- Check responsiveness
- Shout for nearby help
- Activate the emergency response system
- Get naloxone and an AED if possible
2. Is the patient breathing normally?
If yes, prevent deterioration:
- Tap and shout
- Reposition
- Consider naloxone
- Continue to assess responsiveness and breathing until EMS arrives
If no, start CPR:
- Give naloxone
- Use an AED
- Resume CPR until EMS arrives
CPR on a pregnant patient
Oxygenation and airway management should be prioritized during resuscitation from cardiac arrest in pregnancy because pregnant patients are more prone to hypoxia (a condition in which the body or a region of the body is deprived of adequate oxygen supply).
Fetal monitoring should not be undertaken during cardiac arrest in pregnancy because of potential interference with maternal resuscitation.
CPR on a pregnant person should be performed as you would on a non-pregnant patient.